TLDR: Explain how the V4L2 M2M API works through the use-case of implementing hardware video encoding on the Raspberry Pi. This knowledge is generally useful as V4L2 is the de-facto generic API for hardware decoding and encoding on Linux.
Background
My journey started at this video on the excellent Craft Computing YouTube channel which showed how to setup TinyPilot, a Python app for KVM over IP which runs on a Raspberry Pi. Behind the scenes, TinyPilot uses ustreamer to read frames from a HDMI capture card and either exposes it over HTTP or writes it to shared memory. Along with the MJPEG output, support was recently added for encoding video using H264.
Even after messing with the source code, I could not get the H264 encoding
working on my Pi running 64-bit Ubuntu with an error message of
Can't create MMAL wrapper. Digging further, I ran into some insurmountable
roadblocks with the approach taken by ustreamer and discovered the complex state
of hardware encoding on the Pi.
In short, there are three userspace APIs for accessing the HW encoding and decoding on the Pi’s Broadcom chip:
- OpenMAX Integration Layer (OpenMAX IL)
- This API came directly from Broadcom and was the original way to access hardware codecs.
- Support was dropped by Broadcom a long time ago and there appears to be no hope of it ever working on 64-bit OSes.
- ustreamer uses this API to perform MJPEG encoding when specifically requested by the user.
- Multimedia Abstraction Layer (MMAL)
- This API was developed by the Pi developers as a replacement for OpenMAX and
backs tools like
raspistillandraspivid. - While support for 64-bit was added at one point, it was subsequently reverted and, currently, does not work.
- ustreamer uses this API to perform H264 encoding to shared memory.
- Video4Linux2 Memory to Memory (V4L2 M2M)
- V4L2 is Linux API which was historically used for video capture and output. In 2010, the M2M API was added, significantly extending V4L2 and adding support for video codecs.
- The Raspberry Pi kernel has a driver which uses MMAL APIs in kernelspace and integrates with the rest of V4L2.
- Since this is just a generic kernel API, it works out of the box on 64-bit OSes with programs including ffmpeg using it.
Since digging into the internals of MMAL seemed complex, even to knowledgable folks in the Pi community, I decided to try to moving ustreamer’s H264 encoding to use V4L2 instead. As a side benefit, since we’re using Linux kernel APIs, this should also futureproof this code to any new revisions of the Pi.
I quickly ran into the fact that, while lots of people have used V42L for cameras and webcams, only the big projects like GStreamer and ffmpeg use it for encoding. This meant there was no simple guide or example I could follow. However, with a lot of poring over kernel documentation and trial and error, I learnt enough to successfully perform H264 hardware encoding using V4L2 and modified ustreamer to support it.
Using V4L2: step by step
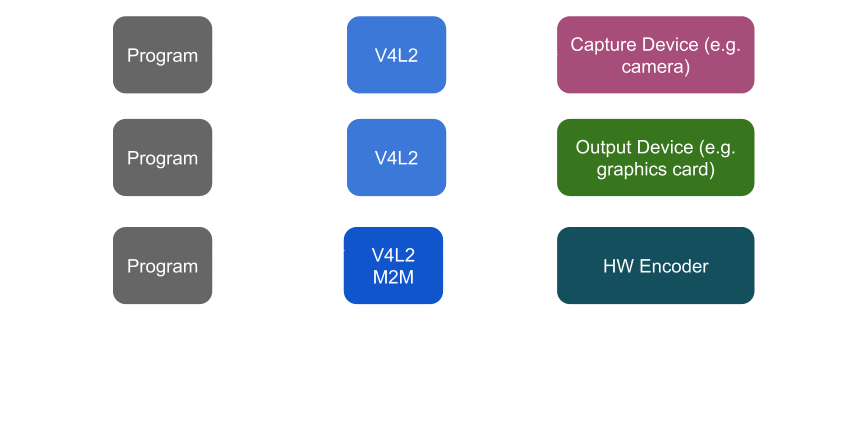
Generally, V4L2 works in either “capture” (frames being read off a device e.g. camera or webcam) or “output” (frames being sent to a device e.g. a graphics card) M2M combines “capture” and “output” into a single mode which allows arbitrary transformations of frames. Video encoding is the obvious example of this but decoding is also supported.
All communication with the hardware encoder on the Pi is done by opening a
special device in /dev (/dev/video11 to be precise), performing ioctls on
the file descriptor to control the encoding and using mmap-ed memory to pass the
frames between userspace and kernelspace.
There are two phases to the encoding process: setup and streaming. In the setup phase, we tell the encoder about things like the pixel format, resolution, frame rate and setup the buffers to pass the frames. The streaming phase involves writing the next raw frame of data to the kernel and reading back the encoded frame.
Note: all error handling is omitted to make the code snippets smaller.
Setup
First, we open the special device for the video encoder. This gives an fd we can
use for ioctls.
#include <linux/videodev2.h>

int fd = open("/dev/video11", O_RDWR);
Next, we setup the “output” and “capture” devices; the most important things to set are resolution and pixel format. The “capture” device will be implicitly set to produce H264 frames with the same pixel format as the output but the resolution needs to be set manually.
Note: confusingly “output” here refers to the raw frames being encoded and “capture” to the encoded H264 output frames. A good way to think about this is to consider how V4L2 was originally designed: frames are sent to output devices like graphics cards and read from capture devices like cameras.
For 1080p raw frames in YUYV format:
struct v4l2_format fm;
struct v4l2_pix_format_mplane *mp = &fm.fmt.pix_mp;

fm.type = V4L2_BUF_TYPE_VIDEO_OUTPUT_MPLANE;
ioctl(fd, VIDIOC_G_FMT, &fm);

mp->width = 1920;
mp->height = 1080;
mp->pixelformat = V4L2_PIX_FMT_YUYV;
ioctl(fd, VIDIOC_S_FMT, &fm);

fm.type = V4L2_BUF_TYPE_VIDEO_CAPTURE_MPLANE;
ioctl(fd, VIDIOC_G_FMT, &fm);

mp->width = 1920;
mp->height = 1080;
ioctl(fd, VIDIOC_S_FMT, &fm);
Now, we set the inter-frame interval to indirectly set the frame rate. For a 30FPS video:
struct v4l2_streamparm stream;
memset(&stream, 0, sizeof(stream));
stream.type = V4L2_BUF_TYPE_VIDEO_OUTPUT_MPLANE;
stream.parm.output.timeperframe.numerator = 1;
stream.parm.output.timeperframe.denominator = 30;

ioctl(fd, VIDIOC_S_PARM, &stream);
The most complex part of the setup is configuring the mmap buffers to send and receive frames. Since we’re not trying to be performant, we use one capture buffer and one output buffer.
struct buffer {
  void* start;
  int length;
  struct v4l2_buffer inner;
  struct v4l2_plane plane;
};

// mmaps the buffers for the given type of device (capture or output).
void map(int fd, uint32_t type, struct buffer* buffer) {
  struct v4l2_buffer *inner = &buffer->inner;

  memset(inner, 0, sizeof(*inner));
  inner->type = type;
  inner->memory = V4L2_MEMORY_MMAP;
  inner->index = 0;
  inner->length = 1;
  inner->m.planes = &buffer->plane;

  ioctl(fd, VIDIOC_QUERYBUF, inner);

  buffer->length = inner->m.planes[0].length;
  buffer->start = mmap(NULL, buffer->length, PROT_READ | PROT_WRITE,
      MAP_SHARED, fd, inner->m.planes[0].m.mem_offset);
}

struct v4l2_requestbuffers buf;
buf.memory = V4L2_MEMORY_MMAP;
buf.count = 1;

struct buffer output;
buf.type = V4L2_BUF_TYPE_VIDEO_OUTPUT_MPLANE;
ioctl(fd, VIDIOC_REQBUFS, &buf);
map(fd, V4L2_BUF_TYPE_VIDEO_OUTPUT_MPLANE, &output);

struct buffer capture;
buf.type = V4L2_BUF_TYPE_VIDEO_CAPTURE_MPLANE;
ioctl(fd, VIDIOC_REQBUFS, &buf);
map(fd, V4L2_BUF_TYPE_VIDEO_CAPTURE_MPLANE, &capture);
Next, we “queue” up the capture and output buffers. This tells the encoder that it has exclusive access to these buffers until we dequeue them.
ioctl(fd, VIDIOC_QBUF, &capture->inner);
ioctl(fd, VIDIOC_QBUF, &output->inner);
Finally, we start the streaming process; this tells the kernel that it should start reading raw frames from the output buffer and writing encoded frames to the capture buffer:
int type = V4L2_BUF_TYPE_VIDEO_OUTPUT_MPLANE;
ioctl(fd, VIDIOC_STREAMON, &type);

type = V4L2_BUF_TYPE_VIDEO_CAPTURE_MPLANE;
ioctl(fd, VIDIOC_STREAMON, &type);
Streaming
The actual encoding process is a straightforward loop where we:
- dequeue an output frame, write the next frame and queue it again.
- dequeue a capture frame, read the encoded frame and queue it again.
// Assumed functions for reading a raw frame and writing an encoded frame.
// Depending on application this can be from a file, a device or anywhere else.
int read_raw(void* buf, size_t len);
void write_encoded(void* buf, size_t len);

int bytes;
do {
  struct v4l2_buffer buf;
  buf.memory = V4L2_MEMORY_MMAP;
  buf.length = 1;

  struct v4l2_plane out_planes;
  memset(&out_planes, 0, sizeof(out_planes));
  buf.m.planes = &out_planes;

  // Dequeue the output buffer, read the next frame and queue it back.
  buf.type = V4L2_BUF_TYPE_VIDEO_OUTPUT_MPLANE;
  ioctl(fd, VIDIOC_DQBUF, &buf);

  bytes = read_raw(output->start, output->length);
  output->plane.bytesused = bytes;

  ioctl(fd, VIDIOC_QBUF, &output->inner);

  // Dequeue the capture buffer, write out the encoded frame and queue it back.
  buf.type = V4L2_BUF_TYPE_VIDEO_CAPTURE_MPLANE;
  ioctl(fd, VIDIOC_DQBUF, &buf);

  int encoded_len = buf.m.planes[0].bytesused;
  write_encoded(capture->start, encoded_len);

  ioctl(fd, VIDIOC_QBUF, &capture->inner);
} while (bytes != 0);
What I learned
There are several useful things I learned while working on this project:
- The kernel documentation had some excellent high-level explanations about how
the API worked
- Specifically this docs page was an exceptional resource as it lays out all the steps needed to perform encoding
- Unfortunately, it only rarely provides code samples so a lot of trial and error was still needed.
- The
kernel source
was invaluable to figure out why error codes were being returned.
- An
ENOSYSerror code is not helpful when it is implementation specific…
- An
- I discovered quite late in the project that loading the
bcm2835_codeckernel module with debugging turned on (by setting the parameterdebug=3) allowed visibility into log messages which I could cross reference with the kernel sources.- This would have saved a bunch of time if I’d known this at the start
- Looking at
straceof ffmpeg trying to encode the same video as my program allowed me to see if there was any hidden or different syscalls.- Instead of an explicit error being returned, I would sometimes end up being unable to dequeue a capture or output frame, hanging ustreamer.
- This included several times when I had missed a required field in a setup ioctl and when I had messed up the order of the queue/dequeue loop.
Conclusion
Hopefully, this article has showed how to approach doing video encoding on the Raspberry Pi from first principles. I’ve also tried to give an overview of the V4L2 API; the beauty of a standard API means much of what I’ve said here is not specific to the Pi but could be reused on any number of situations.
There is a lot more interesting ground I could have covered including non-blocking streaming, DMA and draining the encoder but this post has already run long enough…